|
We continue on our tour of powerful pieces of software that shall make great companions to your Lemur. Native Instruments’ Reaktor 5, one of the most popular graphical audio environments out there, fits remarkably well in that category. Just like the Lemur, it hides behind its sleek looks through-the-roof capacities. This tutorial shows you how to make those two beasts get along well.
Reaktor 5 features support for OSC based communication, which happens to be what the Lemur does best. That’s why we’ll only use the OSC protocol in this tutorial. MIDI is so 1980’s anyway.
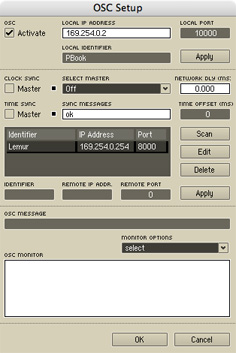
What we first need to do is some setting up so Reaktor and the Lemur are aware of each other’s existence. Let’s begin with Reaktor. In the System menu you’ll find the OSC Settings item. Click on it, and the following window should appear.
|
The first important step is to check the Activate box to activate the OSC server hidden inside Reaktor. This will make it listen to incoming OSC messages on the local port selected on the right. Default is 10000, we have no reason to change that. The Local IP Address should already be set to your computer’s IP, change it if it isn’t. You may now type in anything you want in the Local Identifier field, as we won’t be using this info in this tutorial. Now hit Apply and move on to the middle part of the window.
The second thing we’ll want to do is register the Lemur as a known OSC device to Reaktor, so we can do communication in both ways. To do that, enter a name of your liking in the Identifier field, then fill out Remote IP Address with your Lemur’s IP and set the Remote Port to 8000. This is the port your Lemur listens on for OSC messages. Click Apply : Reaktor is all set. Now let’s set up the Lemur so it speaks to Reaktor on the 10000 port. Leave that OSC Setup window opened while we do that, as we’ll get back to it just after we’re done.
|
|
|
In JazzEditor, hit the Settings button and select the OSC tab. Now set the port for OSC Target 0 to 10000. Leave the ‘Use Slashes’ checkbox ticked. Click OK. This is it, we’ve set up two paths of communication between the Lemur and Reaktor :
 Lemur can send OSC messages to Reaktor on your host’s 10000 port Lemur can send OSC messages to Reaktor on your host’s 10000 port
Reaktor can send OSC messages to your Lemur on its 8000 port
|
We’re done here, now let’s check the communication is working. Create a simple object like a Fader and set it up so it sends out its x parameter. Now move it around on your Lemur : you should see messages appearing on the monitor in the bottom section of Reaktor’s OSC Setup window. If you don’t, there’s something wrong with the setup, make sure you’ve done everything right up to this point. Take note that OSC isn’t activated in Reaktor until the audio is started, so make sure that CPU usage is on.
Last, we’re going to test the communication in the other direction : from Reaktor to the Lemur. If you have a fader named Fader on your Lemur, type Fader/x 0.5 in the OSC message field and hit enter. If you don’t see the Fader move on your Lemur’s screen, check the Lemur’s IP you’ve entered. When all is well, hop on to the next section.
Reaktor 5 offers you two ways of integrating bidirectional OSC control inside an instrument. We’ll play around with both of them and highlight their principal differences, so you can decide which one’s the most appropriate for your various needs.
 Internal object connection Internal object connection
The direct object connection lets you link the state of a Reaktor object, suck as a knob or fader, to incoming or outgoing OSC messages. The advantage of this method is that you don’t have to delve into the actual structure of your instrument to set up OSC communication, everything is done inside your object’s Properties window. An example is worth a thousand words, so let’s load up an Ensemble in Reaktor. Choose any one you want, just make sure it has at least one graphical control such as a knob, switch or fader.

|
The image on the left shows you a part of Native’s SpaceMaster 2 Ensemble, which I’ve chosen here to illustrate the method. You can adapt the directives to another Ensemble of your taste. Now suppose we want to assign that Symmetry knob to a Fader on our Lemur. On the Lemur side we’ll call this Fader, appropriately enough, SymmetryFader, and set it up so it sends out its x parameter.
The first thing to do is to have Reaktor register the /SymmetryFader/x message that’s sent by the Lemur. You can do that just by moving around the Fader on the Lemur for a second. Now Reaktor has recorded the message and will let us use it for our object connection. Double-click on the knob you want to control in Reaktor so its Properties window is displayed. Now move to the last tab, shown on the screenshot. This is where all object-specific connection are made. If you click on the OSC source menu, you should see all the OSC messages registered thus far by Reaktor, including our /SymmetryFader/x message.
An important note about message registration : if you register a new OSC message while the object you want to control is selected, it won’t appear right away in the OSC source menu. This is a bug in the current versio of Reaktor 5 : you’ll need to deselect the object and select it again for the menu to be updated.
Anyway, once you see the /SymmetryFader/x message in the menu, select it : it will now appear in the list of connections for the selected object, with the label From OSC. Quite obviously this means that a one-way connection has been made, so that the incoming OSC message /SymmetryFader/x will control the knob with its argument. Test it yourself : move your Fader up and down and you’ll see the knob following your gestures.
|
Note that you don’t have to worry about value ranges : object connections use the [0..1] range, which happens to be the Lemur’s default range. Of course, if you want to control a Reaktor object with a variable you created yourself with the JazzEditor, you’ll have to make sure it stays in that range.
Okay, so we now have a Fader on the Lemur controlling a knob on Reaktor. That’s cool, but we can do better than that. Suppose you change the selected preset of your Ensemble and the knob position is changed. You’d probably like that to be shown on your Lemur as well. Or maybe you want to be able to control the knob from both the Lemur and the Ensemble panel, in which case the Lemur’s display should be updated in real time to reflect your changes. All of that’s possible from the Properties window. If you click on the OSC Target menu this time, you should find your Lemur in the list of known OSC devices. Select it, and it will appear in the connection list labelled To OSC. That means whenever the knob position is changed on Reaktor’s side, the OSC message /KnobName will be sent to the Lemur with the new position as its argument. That means you just need to change the name of the object to the appropriate string, inside the Label text field at the top of the Properties window. In our case, we want the /SymmetryFader/x value to be updated on our Lemur, so we just need to call the knob SymmetryFader/x. The slash character will automatically be prepended to that name when the message is sent. Now tweak the knob on the Ensemble’s panel : the Fader moves up and down on the Lemur. Once again, no worry about the range, it remains inside [0..1].
That’s it for the direct object connection method ! Know that it will also work with Reaktor and Lemur switches, and any other objects that takes or sends only one value. That means you can’t control a single Reaktor object from a Lemur object’s variable that’s a vector using this particular method. That’s a bit of a downside, but the method we’ll now approach covers that.
Inside the structure
This second method of planting OSC communication inside a Reaktor instrument requires a bit of acquaintance with how instruments are structured in the software. If you have no idea what a Reaktor instrument’s Structure view looks like, we suggest you read a bit of the documentation (or play around, depends on your learning techniques) before you read that section.
Reaktor 5 enables you to use OSC messages at the structural level of an instrument. This means instead of controlling graphical panel elements from the Lemur, we can actually build complex instruments around OSC messages, treated as any other Reaktor events travelling through the wires of the structure. This opens up an astounding bunch of new possibilities : applying math operators on incoming messages, storing them in objects for later reuse, and so on. Two primary objects provide that possibility : OSC Receive and OSC Send. The OSC Receive can be set up to receive any number of OSC messages, the same way as we saw in the previous section, and outputs the arguments of the messages from up to 8 outlets. Alas, there’s no workaround in Reaktor to have an OSC object treat messages with more than 8 arguments, so you may have to tweak your Lemur project to overcome this limitation. Hopefully further updates of Reaktor 5 will bring support for larger messages.
Let’s examine a case of use the OSC Receive object inside an instrument. Of course, the possibilities being pretty much endless with this technique, we can’t cover every possible application. This example is just a means to teach you how to use the object, and hopefully inspire you for your future Lemur controlling of Reaktor instruments.
|
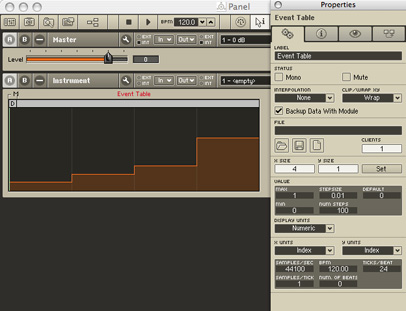
One of the goodies Reaktor 5 comes with is the Event Table object, enabling you to store sequences of events and display them in a fancy way. Event Tables are quite often used in Reaktor-based step sequencers. The Lemur provides a graphical object that fits quite well the role of controlling an Event Table object : the Multislider object. What we’re going to do here is have a Multislider on the Lemur write inside an Event Table. We begin by creating a new Ensemble from scratch, and create an Event Table inside it. In the Properties of the Event Table, we set its dimensions to X:4/Y:1. We now have an unidimensional Event Table that can contain 4 values indexed by X, with Y constrained to 0.
We now create a Multislider on the Lemur named Table, with 4 sliders in it, that will provide values for our new Event Table. Make sure it sends out its x parameter (which is a 4-values vector), and play with it a bit so the message /Table/x is registered by Reaktor.
|
|

|
We now have to build a structure of objects to write in it. First, let’s examine what’s the writing procedure is. Only one value at a time can be stored in the Event Table object. This object expects to get two coordinates input first, in WX and WY, that indicate in which cell a value is to be stored, then it just waits for the value to arrive in inlet In. In our case, the WY coordinate will be set to a constant zero as the Event Table was set up to be a unidimensional vector. For each argument of the incoming /Table/x message, WX will be set to the correct index, between 0 and 3, then the corresponding argument will be routed to the Table’s In inlet.
Since we people are tidy (aren’t we ?), we’ll pack all the writing mechanism inside tiny little macros (see screenshot on the left). Let’s see what we need to put inside the first-level macro.
|
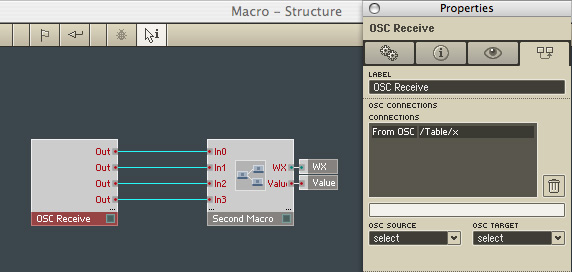
As you can see above, we’ve created an OSC Receive object listening for incoming /Table/x OSC messages. The setup is done in the Properties window, as usual. We also set up the number of outlets to 4 so each argument can be sent through (remember, contrary to Max, Reaktor only handles single-valued events, not lists). All the arguments are routed to yet another macro that does all the complex stuff.

So what exactly is done here ? It’s not all that complicated. When the ith argument of the /Table/x message comes in through the appropriate inlet, it triggers out i as the WX coordinate for writing. In our case, i ranges from 0 to 3. After WX is sent, the actual value of the argument is sent to In for storage. The Order object ensures the coordinate is sent before the value to be stored.
Now that we have an Event Table the Lemur can write in, we’ll create a simple step-sequencer around it, and send feedback to the Lemur on its step position. To do that, we’ll create a global variable in the JazzEditor named step. Its value will be changed by OSC messages coming from Reaktor, through the use of the OSC Send object. The variable’s values will range from 0 to 3, depending on where the reading head is in the Event Table. In JazzEditor, enter the expression set({0, 0, 0, 0}, 1.0, step) in the light attributes of the Table multislider. This way, the slider corresponding to the current step will be dynamically illuminated as the sequencer plays.
To do the OSC sending thing, just create an OSC Send object in the Structure view, rename it with the name of the variable you want to change, in our case step. You can choose the number of inputs for the object, in our case step is a single-valued variable so one is enough. Then double-click on the object and check the connection tab of its Properties window. Choose your Lemur as the OSC target of the generated messages.
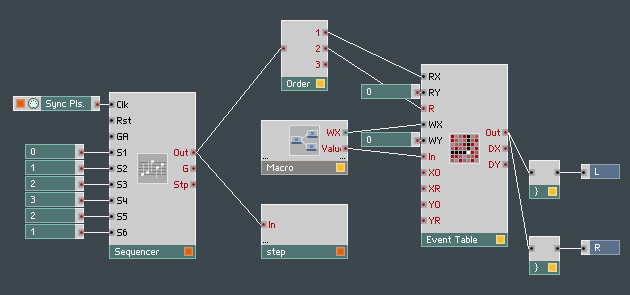
Here’s the final structure after we’ve added the sequencer that increments the read index from 0 to 3 then back to 0. This controls the RX coordinate of the Event Table object, then triggers a Read of the cell value. The corresponding event is read and output from the Event Table object for you to use it.
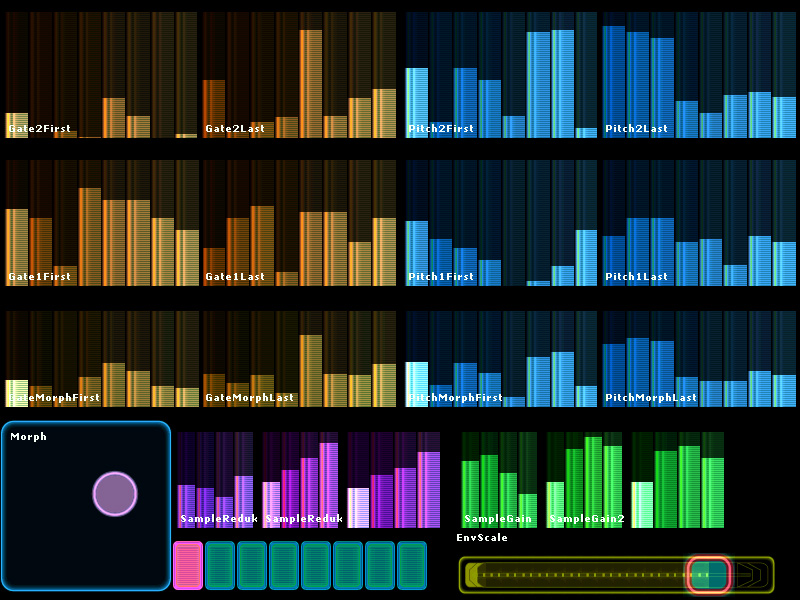
The Lemurized GoBox is Reaktor 4’s GoBox groove box tweaked to work with the Lemur. Sequencers can be controlled through Multisliders, a Morph area controlled from a Multiball interpolates from one setting to the next, giving you visual feedback on both Reaktor’s panel and your Lemur.

|
Once you’ve got your hands on the Ensemble, here are a few instructions on how to use it with the Lemur :
- the bottom row of switches let you switch from one scene to the next.
- when you switch from a scene to another, all your multisiders’ values are saved so they can be recalled when going back to a scene
- the Morph multiball y coordinate controls wether the sequencer is playing the top sequence, the middle sequence, or a weighted average of the two. The third row of multisliders shows you the result of the interpolation.
- the Morph multiball x coordinates interpolates between the 2 pairs of multislider values controlling gain and bit crushing of each used sample. Once again, a third multislider is provided for each parameter so that you can see the result of the interpolation.
- the second interface lets you select the samples for the current scene, and choose your accompanying beat styles
- Hold and Rev buttons add some fun to the process
|
|