|
one of the key features of the v2.0 update is the jazzeditor’s new multi-line script panel.
it can be used, in conjunction with a set of powerful new functions, to instruct your Lemur to perform specific tasks at specific times. from simple actions such as changing a multislider color when a switch is pressed, to complex actions such as commanding a multiball’s balls to follow set trajectories… possibilities are truly endless.

|
|
In order to be understood by your Lemur, your instructions must be encoded as a script, i.e., a combination of variables, functions and operators arranged according to a set of rules. In our case, we could say that the multi-line script panel’s syntax is akin to the JavaScript’s, though as you are about to see, it is definitely not a prerequisite to be acquainted with this programming language to master the Lemur’s scripting abilities…
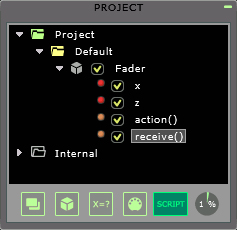
To create a new script, the first step is to select the element you want to associate the script with in the Project panel, be it the entire project, a specific interface, container or object, and click on the Create Script icon. A dialog window will appear, asking you to name the script appropriately. Avoid names taken by internal functions, such as set, firstof, replace and so on, as your script would then temporarily become a substitute for that particular function.
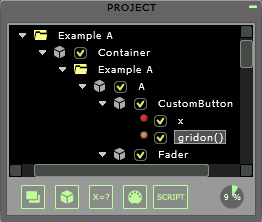
When created, your script will appear in the Project panel, preceded by an orange dot, and followed by brackets containing the script’s arguments, if any, representing the values passed to the script at the time of call.
|
|

|
|
Before beginning to encode the script, it is essential to define precisely when the Lemur should perform the desired task and set the script’s execution mode accordingly. To this end, a choice of 6 different execution modes is available to cover the range of possible situations :
- On Expression/ Trigger: the script’s execution is triggered when the value of the variable or expression entered in the adjacent field changes in the manner specified by the Trigger menu. This is the same Trigger menu that we find in the MIDI or OSC tabs when we assign OSC or MIDI messages to objects. The Trigger menu offers several options: the script can be triggered whenever the variable or expression changes, when it rises from 0, when it reaches 0, when it reaches or rises from 0, each time it increases above its previous value, or each time it decreases below its previous value.

- On Frame: the script’s execution is triggered each Lemur frame, that is, each time the Lemur scans an interface to recalculate the states of the objects on display. The rate at which the Lemur scans a page is inversely proportional to the amount of elements to be calculated. With a maximum rate of 60 frames per second for a blank page, this rate slows down with increasingly complex interfaces.

-
On OSC: the script’s execution is triggered upon reception of the OSC message displayed in the adjacent field, the script’s arguments (OSC_ARGS). By default, this is set to the script’s name (Container/Fader/Scriptname), but can be customized by ticking the Custom Address checkbox.

-
On MIDI: the script’s execution is triggered upon reception of the MIDI message (MIDI_ARGS) defined in the adjacent fields: message type, MIDI Target, MIDI channel.

- On Load: the script’s execution is triggered when the project is loaded on the Lemur.

- Manual: the script’s execution is triggered when called up in another script or expression.

|

|
|
As with algebra, the MultilineScript’s variables are used to hold values or expressions. They can be thought of as “containers” for storing information.
Variables can either be global or local. Global variables include all the Lemur objects’ variables (x, y,…) and parameters (attraction, light…), as well as any user-defined variables created in the Project panel. They can be referred to anywhere in the script simply by entering their names ( Container.Fader.x). Local variables, on the other hand, need to be declared in the script before being acknowledged. They are only visible inside the Script panel, and expire when the script is not in use.
A local variable is declared by using the statement decl :
|

|
|
Note that each instruction in the code must end with a semicolon (;).
|

|
|
In order to provide full control over the Lemur’s objects, V2.0 introduces the concept of attributes. The objects’ attributes include all those object parameters which are editable in real-time, either through instructions in a script with the function setattribute(object,’name’, value), or directly through an OSC command in the form /Container/Fader @grid 1 (activate the Fader’s Grid parameter), /Container/Fader @rect 300 100 60 200 (change the object’s position to X=300 and Y=100, and the object’s dimension to W=60 and H=200), or /Container/Text @content “Hello !!!” (change the displayed text).
The table below presents the list of attributes available for the Fader object, giving the possible values these attributes can take, together with a brief description. A complete list of all the objects’ attributes can be downloaded here.
|
| Attribute | Value | Parameter |
| capture | 0 or 1 | capture off/on |
| color | integer | color of the object |
| cursor | 0 to 3 | cursor mode – Limited, Barycentric, Get Newer, Cap |
| grid | 0 or 1 | grid off/on |
| grid_steps | 1 to 33 | number of grid steps |
| label | 0 or 1 | label off/on |
| physic | 0 to 2 | physics mode – None, Interpolate, Mass-Spring |
| precision | 0 to 6 | decimal places of displayed value |
| rect | {X,Y,W,H} | object’s position and dimensions |
| unit | text | unit of displayed value |
| value | 0 or 1 | value off/on |
| zoom | 1 to 50 | zoom in objects |
|
|
Imagine, for instance, that you would like to activate a MultiSlider’s physic on and off by pressing a switch on your interface. Your script, created locally to your Switch object would consit of the following line:
|

|
|
When working with the JazzEditor, it is useful to know that the function getattributelist(object) can be used to return a list of attributes for the desired object in a Monitor object on your Lemur.
|

|
|
New sets of functions have been implemented into V2.0 in order to facilitate script encoding. Many of these new functions could be referred to as “object oriented” since they allow for the selection and manipulation of an object’s attributes in real-time. Others allow new types of actions, such as computer keyboard or mouse clicks emulation.
The table below presents a list of the new functions available in V2.0 together with a brief description. The arithmetic, trigonometric and vectorial functions common to the previous JazzEditor’s versions can also be used in the multi-line Script panel.
|
| Function | Action |
| arraytostring(array[]) | converts an array to a string a string of values |
| breakpointat(x[],y[],phase) | returns the position of a point along a Breakpoint’s segment |
| ctlout(target,ctrl,val,chan) | outputs Control Change MIDI message |
| findobject(name) | selects an object within a tree structure (project, interface or container) |
| getattribute(object,name) | returns the value of the object’s attribute ‘name’ |
| getattributelist(object) | returns the object’s attribute list |
| getexpression(object,name) | returns the value of the expression |
| getfirst(object) | selects the first object within a tree structure (project, interface or container) |
| getnext(object) | selects the next object within a tree structure (project, interface or container) |
| getobjectrect(object) | returns the objec’s position and dimensions as {X,Y,W,H} |
| getparent(object) | returns an object’s parent Target |
| interlace(a,b) | if a={1,2,3} and b={5,6,7}, returns{1,5,2,6,3,7} |
| interlace3(a,b,c) | if a={1,2,3}, b={5,6,7} and c={8,9,10} returns{1,5,8,2,6,9,3,7,10} |
| keystate(target,key,state) | outputs a keyboard character (key is coded in ASCII, state is 0 or 1) |
| midiout(target,msg[]) | outputs the MIDI message defined by msg[] |
| clickout(target,left or right,state) | outputs a mouse click (left is 0, right is 1, state is 0 or 1) |
| mouseout(target,x,y) | outputs a mouse movement with coordinates x and y |
| nonnull(array) | returns the positions of the non-null items in an array |
| noteout(target,note,vel,chan) | outputs a MIDI Note On message |
| oscout(target,address,args[]) | outputs an OSC message |
| oscout(target,address,args[]) | outputs an OSC message |
| RGB(r,g,b) | converts 3 RGB primary color indices (Red, Green, Blue) into a single value that the parser understands |
| selectinterface(index) | displays the selected interface |
| selecttab(object,index) | displays the selected tab |
| setattribute(object,’name’,value) | sets an object’s attribute ‘name’ to the desired value |
| setexpression(object,name,value) | sets an object’s expression to the given value |
| setobjectrect(object,rect[]) | sets an object’s position and dimensions to {X,Y,W,H} |
| show(object,state) | displays (state=1) or hides (state=0) an object |
| wrap(a,size) | if a={1,2,3,4,5,6,7,8}, wrap(a,5)={1,2,3,4,5} |
|

|
|
The multi-line Script panel understands a wide range of operators such as the arithmetic, comparison and logic operators used in the previous versions of the JazzEditor, but also operators denoting assignment or bitwise operations. Basically assignment operators allow the same variable name to contain different values at different times during the script execution, while bitwise operators allow operations on array patterns at the level of their individual elements.
The table below lists all the operators in V2.0:
|
| Arithmetic | Comparison |
| Operator | Operation | Operator | Operation |
| + | add | > | greater than |
| – | subtract | < | smaller than |
| * | mutiply | >= | greater or equal to |
| / | divide | <= | smaller or equal to |
| ++ | increment | == | equal to |
| — | decrement | | |
| Assignment | Bitwise | Logic |
| Operator | Operation | Operator | Operation | Operator | Operation |
| = | gets set to | & | binary AND | && | AND |
| += | add and assign | | | binary OR | || | OR |
| -= | subtract and assign | << | left shift | ! | NOT |
| /= | divide and assign | >> | right shift | | |
| *= | multiply and assign | | | | |
|

|
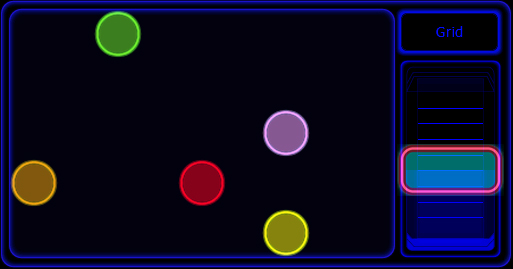
 Example A Example A
We have a Multiball, together with a CustomButton and a Fader. We’d like to be able to switch the Multiball’s grid on or off with the CustomButton, and set the Multiball’s number of balls with the Fader.
Let’s take care of the Multiball’s grid first. In parser terms, switching a Multiball’s grid on or off means setting its ‘grid’ attribute to 0 (off) or 1 (on).
For the script to be executed when the CustomButton is pressed, we need to associate the Script with the CustomButton’s x variable. To do this, we’ll first select the CustomButton in the Project Browser and click on the Script icon. We’ll name this script gridon and set its execution mode to On Expression. We then fill the field adjacent to On Expression with x, and keep the trigger menu to any: the script will be executed whenever the CustomButton’s x variable (its on or off state) changes.
As far as the code is concerned, we’ll use the setattribute(object,name,value) function, where object will be Multiball, name the attribute’s name ‘grid’ and value will be x, the CustomButton’s state:
N.B: don’t forget to type in a semicolon at the end of each instruction !
Let’s take care of the Fader next. Again we’ll use the setattribute(object,name,value) function, but this time the attribute’s name will be ‘nbr’: the number of balls.
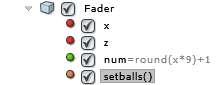
To make this practical, we’ll use a 10 steps grid for the Fader, so that each step upward adds a ball, and each step downward takes one off. We can translate this into a number with an expression local to the Fader: select the Fader in the Project Browser, click on the Create expression icon, name it num for instance and equate it to the expression round(x*9)+1. That way num will take integer values between 1 and 10, values that we’ll use in our script with the setattribute(object,name,value) function to set the number of balls.
We’ll associate the script with the Fader object, to be executed On Expression num (each time the Fader modifies the number of balls) as follows:
Example B
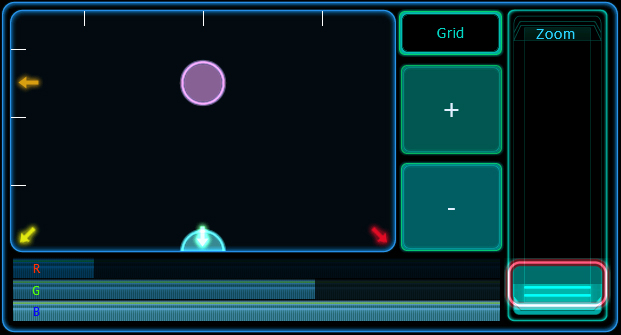
An alternative would be to replace the Fader object with two pads: one for incrementing the number of balls, the other for decrementing. To make it more interesting, we can also add a MultiSlider for setting the Multiball’s color, and a Fader to zoom in the Multiball for increased precision.
We’ll begin with the + Pad together with a script we’ll call increment. Again the execution mode will be On Expression x, but this time we’ll set the corresponding trigger menu so that the script gets executed only when x goes from 0 to positive (we only want the script to be triggered when the pad is pressed, not when it’s released).
We’ll begin our script by declaring a new local variable b, which will correspond to the current number of balls, i.e, the value that we’ll increment. We can use the function getattribute(object,name) to get this info. We’ll then use the arithmetic operator ++ (which simply means “increment”) to increment our b variable before using it with the setattribute(Multiball,’nbr’,b) function.
Similarly, we’ll create a second pad together with a script called decrement. The difference here will be the use of the arithmetic operator — (which means “decrement”).
The MultiSlider object will be used to set the Multiball’s color, with three sliders for mixing the primary colors (Red, Green and Blue) according to the RGB additive color model. In the script, we’ll use the setattribute(object,name,value) function to set the Multiball’s ‘color’ attribute with a value computed by the RGB(r,g,b) function, which will convert the 3 sliders (each between 0 and 1) into a single color value that the parser understands.
Note that the value of the color attribute can range from 0 to 8355711: ((R x 2^16) + (G x 2^8) + B), where R, G and B are values between 0 and 127.
Finally we’ll create a script for the Fader object in order to control the Multiball’s ‘zoom’ attribute. Since the ‘zoom’ attribute takes values between 1 and 50, we’ll need to scale the Fader’s x variable by multiplying it by 50 and adding 1:
Example C
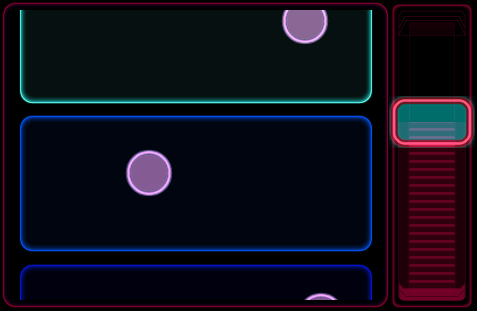
The setattribute(object,name,value) can also be used to change the dimensions of an object and/or move it around by changing its ‘rect’ attribute. The‘rect’ attribute takes values in the form {X,Y,W,H}, where, as in the JazzEditor’s Properties panel, X is the horizontal position of the object, Y the vertical position, W the width of the object and H the height.
In the example below, we’ve got large Container called Containerbig filled with Multiball objects, and in order to gain space, we’ve enclosed it within a smaller Container called Containersmall and add a Fader to scroll up and down the multiballs.
The script, local to the Fader object, and whose execution is initiated by any change in its x variable (each time the Fader moves up or down), uses the value of x to multiply the Y element of Containerbig‘s rect attribute, thereby changing its vertical position within the smaller container:
Lastly, we’ve added an horizontal Fader object called Fader2 whose width is recalculated as the Fader is displaced. Maybe not the kind of Fader you’d like to use for controlling your master volume in a Live situation, but interesting nonetheless. Try changing the Fader’s Physics to Mass-Spring to make it more fun.
Here we begin the script by declaring a new local variable temp, then use the function getobjectrect(object) to obtain the existing value of the rect attribute in the form {X,Y,W,H}. In the third line of code, the Fader’s new position modifies the third element of the vector tmp (tmp[2]), which corresponds to the width of the object. Finally the freshly calculated variable tmp is injected in the setobjectrect(object,rect[]) to modify the width of the object.
|
|