|
The Lemur is the perfect companion for live performances. Often you will find yourselves in situations where you want visual feedback of what’s happening on your setup : level meters, sequencer position, and so on. With OSC bidirectional control, the Lemur provides that, and much more. Here’s a glance at the possibilities offered by your controllable controller.
We’ll use Max in this workshop session, although other OSC compatible software are capable of two-way communication with the Lemur. Set up OSC Target 0 to send data to the 8000 port (newbie hint : look at the Settings button on the top-right corner of the JazzEditor program). Load up the supplied interface and Max patch : you’re ready to go. Now we’ll cover the different subpatches in order.
 Setting up the network objects Setting up the network objects
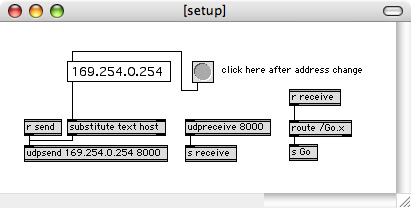
This is quite straight forward : we send to port 8000 of your Lemur’s IP adress, and receive messages in port 8000 on the local machine. Just modify the supplied Lemur’s adress if necessary. Notice that the Go.x message is received in this subpatch, it will be dispatched wirelessly to other sections through the use of send and receive objects.
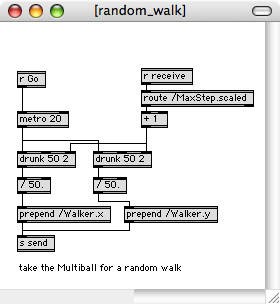
Take a random walk
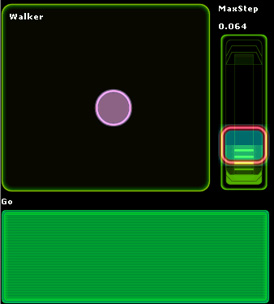
When you hit the green Go button, you’ll see the ball taking a walk inside its space. The x and y coordinates are controlled by two drunk objects in Max, which send values every 20 ms. The MaxStep fader on the right controls the maximum range that can be walked during that time interval (remember that default x and y coordinates stay in the [0..1] range).
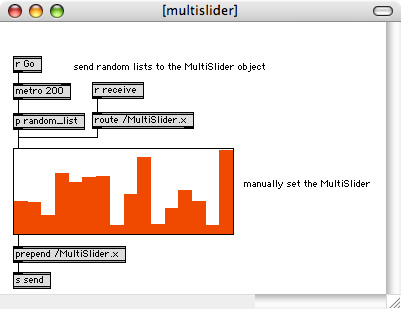
Move your sliders
If your Go switch is still activated, you should see the Multislider going totally insane, along with the display in the subpatch window. As you can see, Max reflects exactly the state of your Multislider, and vice versa. Indeed you can stop the animation by pressing Go again, move around the sliders manually in Max or on the Lemur : both displays are updated in real-time. Isn’t that what bidirectional control is all about ?
Interface switching
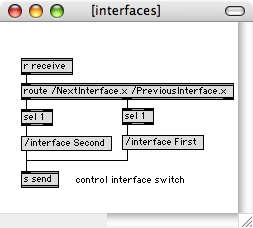
You probably know that your Lemur comes with two physical switches on the top to select the currently displayed interface. You can actually do that dynamically with OSC remote controlling. Just send your Lemur the /interface message followed by the name of the interface you want to see, that’s it. That’s what the purple NextInterface and PreviousInterface pads are for on the project that comes with this session. We’ve just assigned some pads to the /interface message, but you could much more. Like having an automatic interface switch when you reach some point in time during a performance. With bidirectional control, the sky’s the limit.
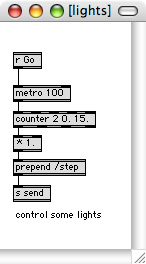
Let there be light
V1.3 of the Lemur brought the Light property to several interface objects. This comes out as a perfect example of how to use bidirectional control. We’ve set up a column of pads to have their Light property (in our case, an array of floats) controlled by a global variable named /step. The corresponding subpatch in Max iterates that variable from 0 to 15 and back, giving you a nice K2000 like effect. This can turn out handy when implementing a step-sequencer on the Lemur, highlighting notes as they are played.
Linking interface objects
You can link several objects’ behavior through the use of remote OSC control. In our example, the LinkRings switch link the coordiantes of the 2 balls in the RingAreas. Just press it and any move on one of the objects will be mirrored in the other.
Starry night
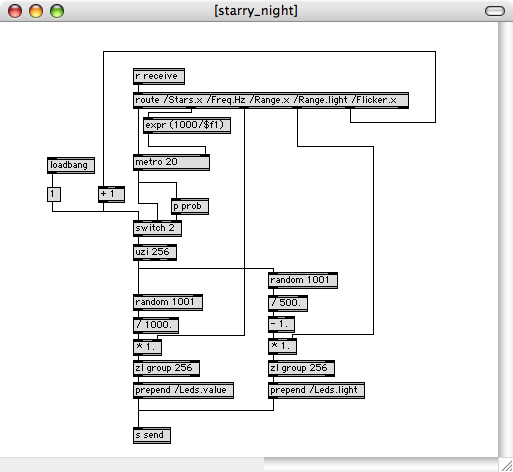

This one is for the eye-candy. Switch to the Second interface, and press the Stars button. What we’re doing here is sending periodically random values for the Value and Light properties of a matrix of 256 leds. Play around with the Frequency fader, controlling the blinking speed, the Range area controlling the controlled variables’ range, and the Flicker button to add some icing on the cake (mostly noticeable with high frequencies).
|