|
This template provides an emulation of the Mackie Control protocol, letting you control and visualize from your Lemur track levels, effects and instruments parameters, panning, track states (armed, soloed, muted), as well as navigate throughout your Song and still keep an eye on the timecode.
Of course, emulating the Mackie is just one slice of the Lemur’s possibilities, that’s why the template also provides you with a MIDI keyboard displayed as a matrix, a pitch bend with mass-spring physics and a bouncing ball to control the sends of any track.
|
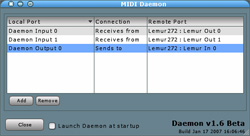
First, let’s setup a few things to make it all work. This Lemur template makes use of 2 MIDI targets. Target zero is used for all Mackie-related objects : they must send and receive MIDI from Live. If you’re on a Mac, set this target to use Daemon Output 0 and Daemon Input 0 as the I/O ports. On Windows, use any available pair of ports.
Objects not using reserved MIDI messages part of the Mackie protocol use target 1. That way, pushing a note on a MIDI keyboard won’t accidentally trigger a special Mackie function in Live, and vice versa. Setup target 1 to use a different port for output, and leave the input to None (we don’t need these objects to be remote controlled by incoming MIDI).
|
|
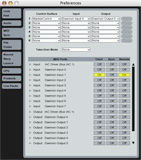
Now let’s move to the Ableton Live preferences. You must setup Live to use the Mackie Control protocol on the ports you selected for MIDI target zero. DO NOT activate those ports in the Active Devices part : that way the messages coming out of the corresponding objects will always be interpreted as Macki commands, and won’t be routed to MIDI tracks or anything.
Setup the port you chose for MIDI target 1 as an MIDI input for Track and Remote : the corresponding objects can now be assigned using the usual MIDI Map functions in Live, and can be routed to MIDI virtual instruments.
Now that things are set, open the bundled Live project Live.als. Here’s a walkthrough of the two interfaces on the project.
|
|
 01 Mix 01 Mix
This interface gives you a transport section to navigate and record into your Song. The Jog Wheel is functional only when the Arrangement view is active in Live.
8 Faders let you control the Levels of eight tracks in your song. If you have more than eight tracks, you can use the Bank_L and Bank_R buttons to switch to the previous or next group of eight tracks. The Chan_L and Chan_R buttons do the same but use an offset of 1 instead of 8.
The rows of pads at the top let you select tracks in Live, arm, solo or mute them.
Last, the Ball on the right controls Send A and B levels for the track selected by the matrix of switches under it.
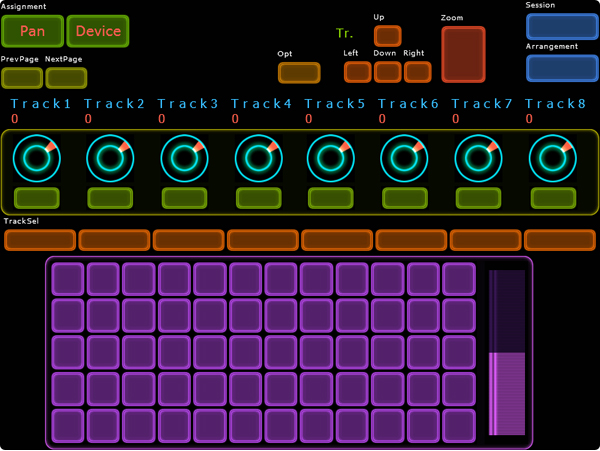
02 Pots and Keyboard
The second interface is the most powerful one. It provides a text display showing you info on the parameters you are currently modifying. The modifications are done through the eight endless Pots and their corresponding button. The assignment buttons let you choose wether you want to control panning of each track with the Pots, or special device (FX or Instruments) parameters.
When selecting the Device assignment, you are shown all the device on the selected track. You can change the selected track through the row of Pads, or the cursor keys on the top. Choose the device you want to control by clicking on the corresponding Pot button. One you’re there, you can see all modifiable parameters and tweak them from the Pots and their associated buttons. Should the device provide more than eight parameters, you can page up and down through them by pushing the PrevPage and NextPage buttons (they are lit up when another page is available).
Two pads let you change the current view (Arrangement or Session) shown in Live. When in Session view, the cursor keys let you navigate through the clips, and launch them from the Zoom button. To stop a highlighted clip,hold the Opt pad when pushing Zoom. The Zoom button conveniently gives you visual feedback on the state of a clip (playing or stopped).
Last, the big matrix of Pads on the bottom can send MIDI notes to a VSTi : in this project a sampler on track 8.
|