|
this tutorial will show you examples of how to interface your lemur to supercollider, an increasingly famous and powerful object-oriented programming environment dedicated to audio processing. with supercollider being free and largely based on the OpenSoundControl standard, it only seems logical to try it with the best osc controller out there.
This tutorial assumes that you already have a basic knowledge of object oriented programming and of the main Supercollider concepts. In any case, you can just install the example files, hook your Lemur up and launch SC3, and you’ll be good to go.
This section introduces you to the Lemur class file that has been developed to make it easier for you to interface your controller with SuperCollider. The file is named Lemur.sc and must be placed inside your SCClassLibrary folder for it to be compiled by SC3 at launch.
When this is done, you’ll have access to a new class of object called surprisinglly enough Lemur, that you can instantiate as many times as you want, supposing you have a whole zoo of them on your LAN. Each object that you create from the class will be a SuperCollider abstraction of the corresponding controller.
The following line creates a Lemur object based on its IP adress, and gives it a name.
~lemur = Lemur.new("MyLemur", "169.254.0.254");
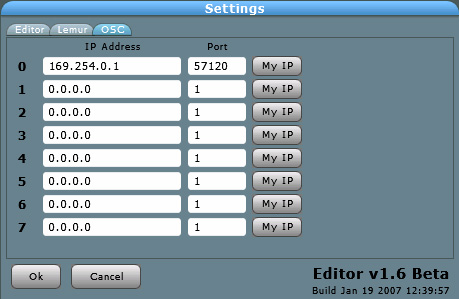
Now that the object is created, let’s see what can be done with it. Obviously what you’ll want to do first is receive the messages coming out of the beast and use them in some way in your program. For that, make sure your Lemur is set up to send OSC Target 0 messages on the 57120 port, which is the port used by the SuperCollider interpreter.

As in any object oriented language, an object in SuperCollider is composed of methods : functions to use the object in a certain way. The first method we’re going to look at is addResponder. This method creates an object that will constantly listen for a specific kind of message coming out of your Lemur, and do some stuff with it.
Suppose you have a Fader set up on your Lemur and you want to have its value printed each time it is updated. Look at the following piece of code :
~lemur.addResponder("/Fader/x", {
	arg array;
	array.postln;
});
This tells the SuperCollider interpreter to print /Fader/x messages coming out of your Lemur. If you execute that block of code and move your Fader up and down, you should see stuff like that appearing on your Listener Window :
[ 0.38097780942917 ]
[ 0.38032084703445 ]
[ 0.37986096739769 ]
[ 0.37044814229012 ]
[ 0.36385914683342 ]
[ 0.35924685001373 ]
[ 0.35601824522018 ]
[ 0.36057639122009 ]
[ 0.36376708745956 ]
[ 0.37281876802444 ]
[ 0.38597312569618 ]
[ 0.39518114924431 ]
Similarly, if you have a Multislider on your Lemur interface with 3 sliders in it, execute the following block of code :
~lemur.addResponder("/MultiSlider/x", {
	arg array;
	array.postln;
});
Moving the sliders up and down on your controller should get you something like this :
[ 0.68749994039536, 0.68749994039536, 0.54166662693024 ]
[ 0.68749994039536, 0.62499994039536, 0.54166662693024 ]
[ 0.68749994039536, 0.62499994039536, 0.62499994039536 ]
[ 0.68749994039536, 0.62499994039536, 0.59374994039536 ]
[ 0.68749994039536, 0.62499994039536, 0.56249994039536 ]
[ 0.68749994039536, 0.62499994039536, 0.53124994039536 ]
[ 0.28124997019768, 0.62499994039536, 0.53124994039536 ]
[ 0.28124997019768, 0.27083331346512, 0.53124994039536 ]
[ 0.28124997019768, 0.24999998509884, 0.53124994039536 ]
[ 0.28124997019768, 0.18749998509884, 0.53124994039536 ]
[ 0.28124997019768, 0.15624998509884, 0.53124994039536 ]
Now what does all that tell us about the addResponder method ? Easy, just provide it with two arguments :
– a string describing the kind of messages you’re waiting for : “/MultiSlider/x”
– a function that takes an array as an argument, and does something with it : { arg array; blahblahblah…….. }
As you can see from the examples above, each time SuperCollider hears a message on the 57120 port that you’re interested in, it executes the function in the corresponding responder, passing it all the values in the message packed in an array. If you build a responder for a simple Fader message, your function will receive as an argument an array with only one value in it. If you build a responder for a Multislider with 3 sliders in it, your function will receive an array with three values in it, and so on. What’s up to you is to decide what you want to do with these arrays. Here’s a basic use :
~lemur.addResponder("/Fader/x", {
	arg array;
	("My new fader value is " ++ array.at(0)).postln;
});
And a less trivial one :
~lemur.addResponder("/Switch/x", {
    arg array;
	if ( array.at(0) == 1, {
		~synth = Synth("default");
	},{
		~synth.free;
	});
});
The first one simply gets a Fader value out of its array and print it with some accompanying text. The second one supposes you have a Switch object set up, creating a Synth when it’s on and destroying it when it’s off. Those are pretty simple functions, now go have some fun with more complex ones : the possibilities are endless.
To finish with the addResponder method, here’s an important point : you can create multiple responders for the same message, by calling the method several times. That means you can have a Fader control 3 Synth levels and another one’s frequency at the same time !
Now if you want to stop listening to a specific message just use the removeResponder method :
~lemur.removeResponder("/Fader/x");
This will automatically forget all the responders that were previously created for the Fader/x message.
To make it easier for you, a method has been provided to destroy all responders bound to a specific Lemur object : removeAllResponders. It takes no argument, and does all the cleaning for you :
~lemur.removeAllResponders;
As you probably know, not only can your Lemur talk, but it can listen too. Objects on your Lemur interfaces can react to incoming OSC messages. There’s a method implemented for that in the Lemur class : sendMsg. It simply takes an OSC message packed in an array as an argument, and sends it to the Lemur. Try for yourself !
~lemur.sendMsg(["/Switch.light", 1.0]);
A more complex one :
r = Routine.new({
	10.do({
		arg i;
		~lemur.sendMsg(["/Switch.light", (i%2).asFloat]);
		0.2.wait;
	});
});
r.play;
As of v1.3 of the Lemur firmware, you must use floats in your outgoing messages for them to be well interpreted. Support for integers will be added in upcoming updates.
When playing with your Lemur and SuperCollider, there’ll be numerous times when you want to assign a Fader to a control in a Synth, such as the frequency of an oscillator or other stuff like that. The previous sections of this tutorial show that you can do that with the addResponder method, making up a function that gets the Fader value and sends it to a running synth. The Jazzmutant team felt there should be a faster way to do that, and that’s where the map methods come into play.
Suppose you have set up a synth that takes a volume level as an argument. Something like that :
s = Server.local;
s.boot;
~lemur = Lemur.new("MyLemur", "169.254.0.254");

~synth = SynthDef("Sine", {
	arg level = 0, dev = 0;
	Out.ar(0, SinOsc.ar(440+dev, 0, level));
}).play(s);
For the moment, you can’t hear anything, as the default value for the level argument is zero. Now let’s assign a fader on the Lemur to that synth’s level. In SuperCollider, a single line of code does that :
~lemur.map(~synth, "level", "/Fader/x");
The prototype of the method is quite straightfoward :
– the first argument is the Synth object you want to control
– second argument is the name of the controllable value in that synth (declared as an arg in the SynthDef)
– last one is the message that should be mapped
Move your Fader up and down. The value of Fader/x is passed unchanged to the Synth whenever it is updated. However, you might want the value – which is in the defalut range [0..1] – to be processed a bit before it is passed to the Synth. For that, we’ve provided two methods.
Try this line :
~lemur.mapScaled(~synth, "dev", "/Fader/x", 0, 200);
The value from Fader/x goes through a linear scaling function, so that its final range is [0..200]. The arguments are the same as those for the map method, except for the two additional ones, which provide the boundaries of the range. Note that the order is taken into account. If you executed the following line instead of the previous one, the effect would be reversed.
~lemur.mapScaled(~synth, "dev", "/Fader/x", 200, 0);
As you can see, we’ve created two mappings for the same Fader/x message : once again, you have the freedom to create all the mappings you want for any single message. The unmap method will destroy all the mappings for a specific messages.
~lemur.unmap("/Fader/x");
Be aware that it will also remove all the responders you might have built yourself for that same message. That means the removeResponder and removeAllResponders methods can also clear your mappings.
To finish with mappings, we thought a linear scaling wasn’t always enough, so we developed the mapXScaled method. It takes the same arguments as mapScaled, but it creates a exponential range instead of a linear one. This can be turn out very helpful when controlling oscillators’ frequencies. Try this piece of code :
~synth.free;
~synth = SynthDef("Sine", {
	arg freq = 200;
	Out.ar(0, SinOsc.ar(freq));
}).play(s);
~lemur.mapXScaled(~synth, "freq", "/Fader/x", 200, 2000);
See ? Now let’s clean all that up.
~synth.free;
~lemur.removeAllResponders;
If you made it thus far, you probably know all about the SuperCollider Lemur class. As a gift for your attention, here’s a full-blown example of using your Lemur to control a SuperCollider project : the SuperSampler.
The SuperSampler divides a main full-length sample into 16 sub-samples. The main sample can be recorded from your soundcard input, or can be imported from an audio file on your system (Mac-only feature).
 Sample recording Sample recording
Select the full sample length using the BufLength fader, then hit the Rec button. The recording will stop after the selected duration has elapsed, though you can also stop it manually by hitting the button again.
Sub-samples playing
The block of pads at the top left corner of the main interface lets you activate sub-samples manually, with a 16-voice polyphony. An ASR envelope and a loop switch give you some control over the pads’ playing style.
Sequencing
A minimalist sequencer has been implemented through a Routine in SuperCollider. Just hit the Seq button and have fun with the Tempo fader. The SetToRT button sets the tempo so that the 16-pad sequence sounds just like the main buffer.
Hit the Randomize button for more fun, especially when using rythmic percussive samples.
Sample loading (Mac-only)
See the green buttons on the main interface ? Those are used to load external samples into the instrument. Each Store button brings up an Open dialog on your computer screen and lets you choose any audio file. Just make sure it’s not stereo, as the instrument doesn’t support stereo files yet.
When a sample has been stored, the corresponding Load button lightens up to notify you that it’s ready to be sent to the pads. Just hit that Load button and play with the sequencer or the pads : note that the Tempo and the BufLength are automatically updated to correct values. That means you can record a sample while listening to an external one, guaranteeing perfect synchrony.
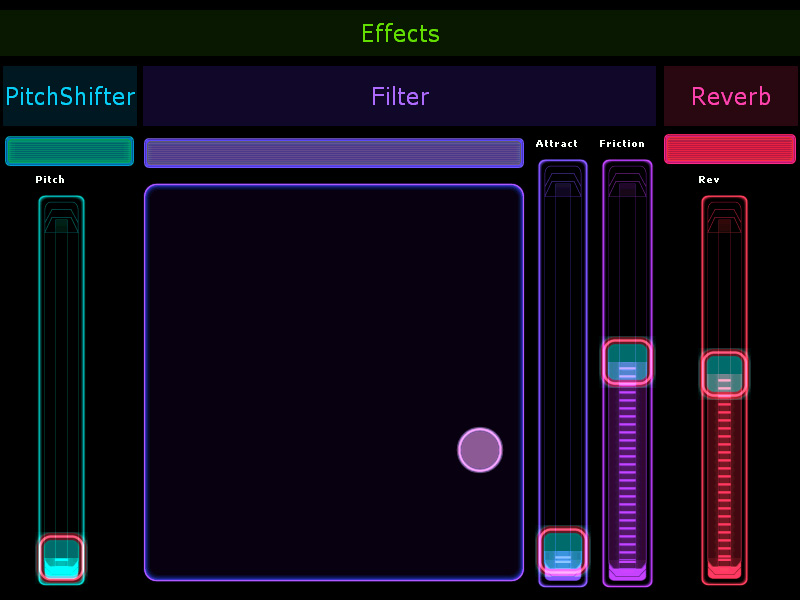
FX Section
The icing on the cake : a second interface lets you have fun with some insert effects. The controls are quite straightforward, so I’ll let you experiment with those on your own.
Implementation
The implementation of this instrument in SuperCollider obvisouly makes extensive use of the Lemur class, with multiple responders set up for the different interface objects. Let’s see some excerpts of particular interest.
The Lemur instantiation – don’t forget to change “169.254.0.254” to your actual Lemur’s IP !
~lemur = Lemur.new("Lemur", "169.254.0.254");
Some responders :
~lemur.addResponder("/BufLength/sec", {
	arg array;
	~newLength = array.at(0);
});
~lemur.addResponder("/Rec/x", {
	arg array;
	if (array.at(0) == 1, {
		~record = Synth("Record", [bufnum, b.bufnum, buflength, ~newLength]);
	},{
		~record.free;
		~swap.value(b);
		~buf_mem_lights.do({|item, i| if (item == 1.0, {~buf_mem_lights.put(i, 0.5);});});
	});
});
Some mappings have been done for the FX section :
~lemur.addResponder("/PitchOn/x", {
	arg array;
	if (array.at(0) == 1, {
		~pitchFX = Synth.tail(~pitch_group, "PitchShifter", ["ratio", ~lastPitchRatio]);
		~lemur.addResponder("Pitch/x", {
			arg array;
			~lastPitchRatio = exp(array.at(0)*log(4));
		});
		~lemur.mapScaled(~pitchFX, "ratio", "/Pitch/x", 1, 4);
	},{
		~pitchFX.free;
		~lemur.removeResponder("/Pitch/x");
	});
});
Last, some messages are sent from the SuperCollider interpreter to the Lemur, to reset interface objects to default positions or control objects’ light property :
~lemur.sendMsg(["/Rec.x", 0.0]);
~lemur.sendMsg(["/Loop.x", 0.0]);
~lemur.sendMsg(["/Seq.x", 0.0]);
~lemur.sendMsg(["/Randomize.x", 0.0]);
~lemur.sendMsg(["/BufLength.x", 0.5]);
~lemur.sendMsg(["/Tempo.x", 0.047]);
~lemur.sendMsg(["/ASR.x", 0.0, 1.0, 1.0]);
~lemur.sendMsg(["/PitchOn.x", 0.0]);
~lemur.sendMsg(["/Pitch.x", 0.0]);
~lemur.sendMsg(["/RevOn.x", 0.0]);
~lemur.sendMsg(["/Rev.x", 0.0]);
~lemur.sendMsg(["/FilterOn.x", 0.0]);
~lemur.sendMsg(["/FilterBall.x", 0.05]);
~lemur.sendMsg(["/FilterBall.y", 0.2]);
~lemur.sendMsg(["/Pads.light"] ++ Array.fill(16, {0.0}));
~lemur.sendMsg(["/Load.light"] ++ Array.fill(4, {0.0}));
There are of course numerous things to say on the chosen implementation for the SuperSampler. However I chose to focus on the Lemur side of things, I leave the inspection of the rest to you. Feel free to improve on the instrument, there are loads of things that could be added. Please share your opinions and improvements with the !
|